
Apply Polyurethane Sealer
From How to Get a Hardwood Look on Carpeted Stairs · Step 11 of 11 · Video by Repurpose and Upcycle
Showing 2:01–2:44 of the source video. Watch the full video with every moment.
What happens in this clip
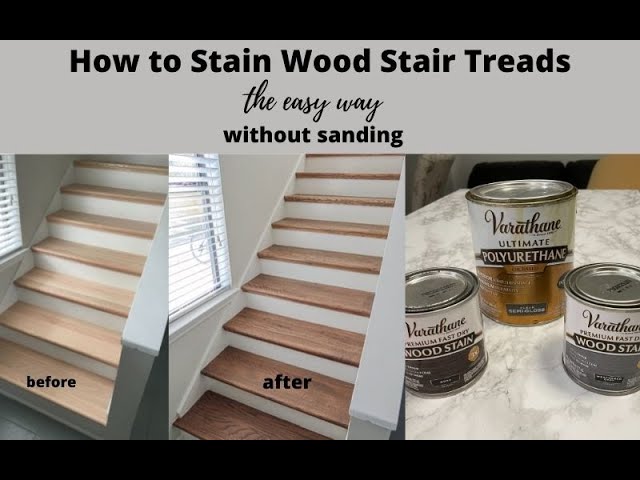
Once the stain has completely dried (refer to product instructions for recommended drying times, usually a few hours), it's time to apply the polyurethane sealer. Sealer is extremely important for high-traffic areas like stair treads as it provides durability and protection against wear and tear. Using a clean paintbrush, apply the polyurethane in the direction of the wood grain. Similar to staining, use cardboard to protect the adjacent white risers and walls, ensuring a clean application line. The biggest tip when working with sealer is to make sure to brush out any drip marks or excess product immediately to avoid visible streaks and uneven finish. Apply multiple thin coats, allowing adequate drying time between each coat, according to the manufacturer's instructions, for maximum durability.
Goal: Protect stained stair treads with a durable polyurethane sealer.
What's used
Tools
- Cardboard
- Plastic sheeting
- risers) from sealer.
- Paintbrush
- Roller for polyurethane
- Rubber gloves
- Varathane Ultimate Polyurethane (Clear Semi-Gloss) Varathane
About the full video
This DIY project demonstrates how to stain and seal wooden stair treads to transform their appearance. It covers the preparation of the wood, mixing custom stain colors, applying the stain with a lint-free cloth (or brush), wiping off excess, and finally, applying a durable polyurethane sealer for protection. Key tips include working quickly due to fast-drying stain and using cardboard as a guard for clean lines instead of painter's tape.
Step 11 of 11: Apply Finish (Stain and Sealant)
If staining, apply the stain evenly with a brush or cloth, following the wood grain. Wipe off excess stain as per manufacturer instructions. Allow the stain to dry completely. Once dry, apply the first coat of sealant (e.g., polyurethane). Allow it to dry thoroughly, then lightly sand with very fine-grit sandpaper (320 grit or higher) and wipe clean. Apply subsequent coats of sealant, repeating the light sanding and cleaning process between each coat for optimal smoothness and durability. Typically, 2-3 coats are recommended for staircases.
Every video in How to Get a Hardwood Look on Carpeted Stairs
Step 1: Remove Carpet and Padding
- 0:04–0:34 Remove Old Carpet and Padding
- 0:21–0:50 Remove the Carpet
- 0:44–2:00 Remove Old Carpet
Step 2: Remove Staples and Nails
- 0:31–0:55 Remove Tack Strips and Staples
- 0:13–0:38 Remove Carpet and Prep for Installation
- 1:19–1:49 Remove Staples and Protruding Nails
Step 3: Inspect and Repair Stair Structure
- 0:09–0:14 Repair and Prepare Stair Structure
- 1:40–2:44 Prepare Surface by Filling Holes
- 3:59–6:57 Replace Damaged Stair Treads or Risers
Step 4: Clean and Sand Stair Surfaces
- 1:05–1:18 Vacuum Dust and Perform Fine Sanding
- 0:51–0:57 Strip Old Finish from Tread Surfaces
- 0:37–0:41 Sand the Staircase
Step 5: Measure and Cut Hardwood Treads and Risers
- 6:09–11:07 Measure and Cut Treads
- 0:43–0:52 Measure and Cut New Treads
- 3:40–6:00 Measure and Cut Risers
Step 6: Install Hardwood Risers
- 0:35–0:46 Install the Riser Boards
- 2:49–3:19 Install Retro Risers
- 3:55–5:35 Cut and Install Stair Risers
Step 7: Install Hardwood Treads
- 10:00–11:40 Install Hardwood Treads and Risers
- 0:49–2:35 Install the Tread and Nosing Components
- 2:35–4:25 Secure New Stair Treads
Step 8: Install Stair Nosing (if applicable)
- 4:41–5:53 Cut and Install Nosings
- 0:37–0:41 Install Stair Nose Trim
- 13:39–14:45 Measure and Install Stair Nosing
Step 9: Fill Nail Holes and Gaps
- 16:00–16:30 Apply Wood Filler for Finishing Touches
- 0:55–1:21 Apply Wood Filler to Blemishes
- 0:07–0:25 Inspect and Fill Imperfections
Step 10: Sand Repaired Areas and Final Surface
- 2:44–3:20 Sand Surfaces and Control Dust
- 1:21–1:35 Sand and Clean Stairs
- 1:47–2:00 Fill and Sand Risers
Step 11: Apply Finish (Stain and Sealant)
- 0:45–0:59 Apply Protective Topcoat
- 11:09–11:34 Apply Protective Wood Top Coat
- 2:01–2:44 Apply Polyurethane Sealer (this video)
How to Get a Hardwood Look on Carpeted Stairs
This project outlines the process of removing carpet from stairs and installing a hardwood finish to achieve a hardwood look. It involves removing existing carpet, preparing the stair treads, and installing new hardwood treads and risers.
Read the full guide Browse all guides
Planning this project? Shop Oak Valley Designs.

Subscribe for exclusive updates
Be the first to know about promotions, new products, and sales.